
Monday, April 23, 2012
Pin-tastic: Strawberry Icebox Cake
I needed a dessert to take to lunch at church with our new Sunday School class and this is what I decided on. It was super easy and really good. Although admittedly someone else brought an even yummier dessert! This was still gone by the end of the day!
 **This post brought to you by the letter K for Kitchn Blog
Cinna-Bunnies
Riley had snack a few days before Easter so I decided to make cinna-bunnies. He thought it was the best thing EVER. And they were super easy since you just use canned cinnamon rolls.


**This blog post brought to you by the letter P for Pinterest...
Pinewood Derby
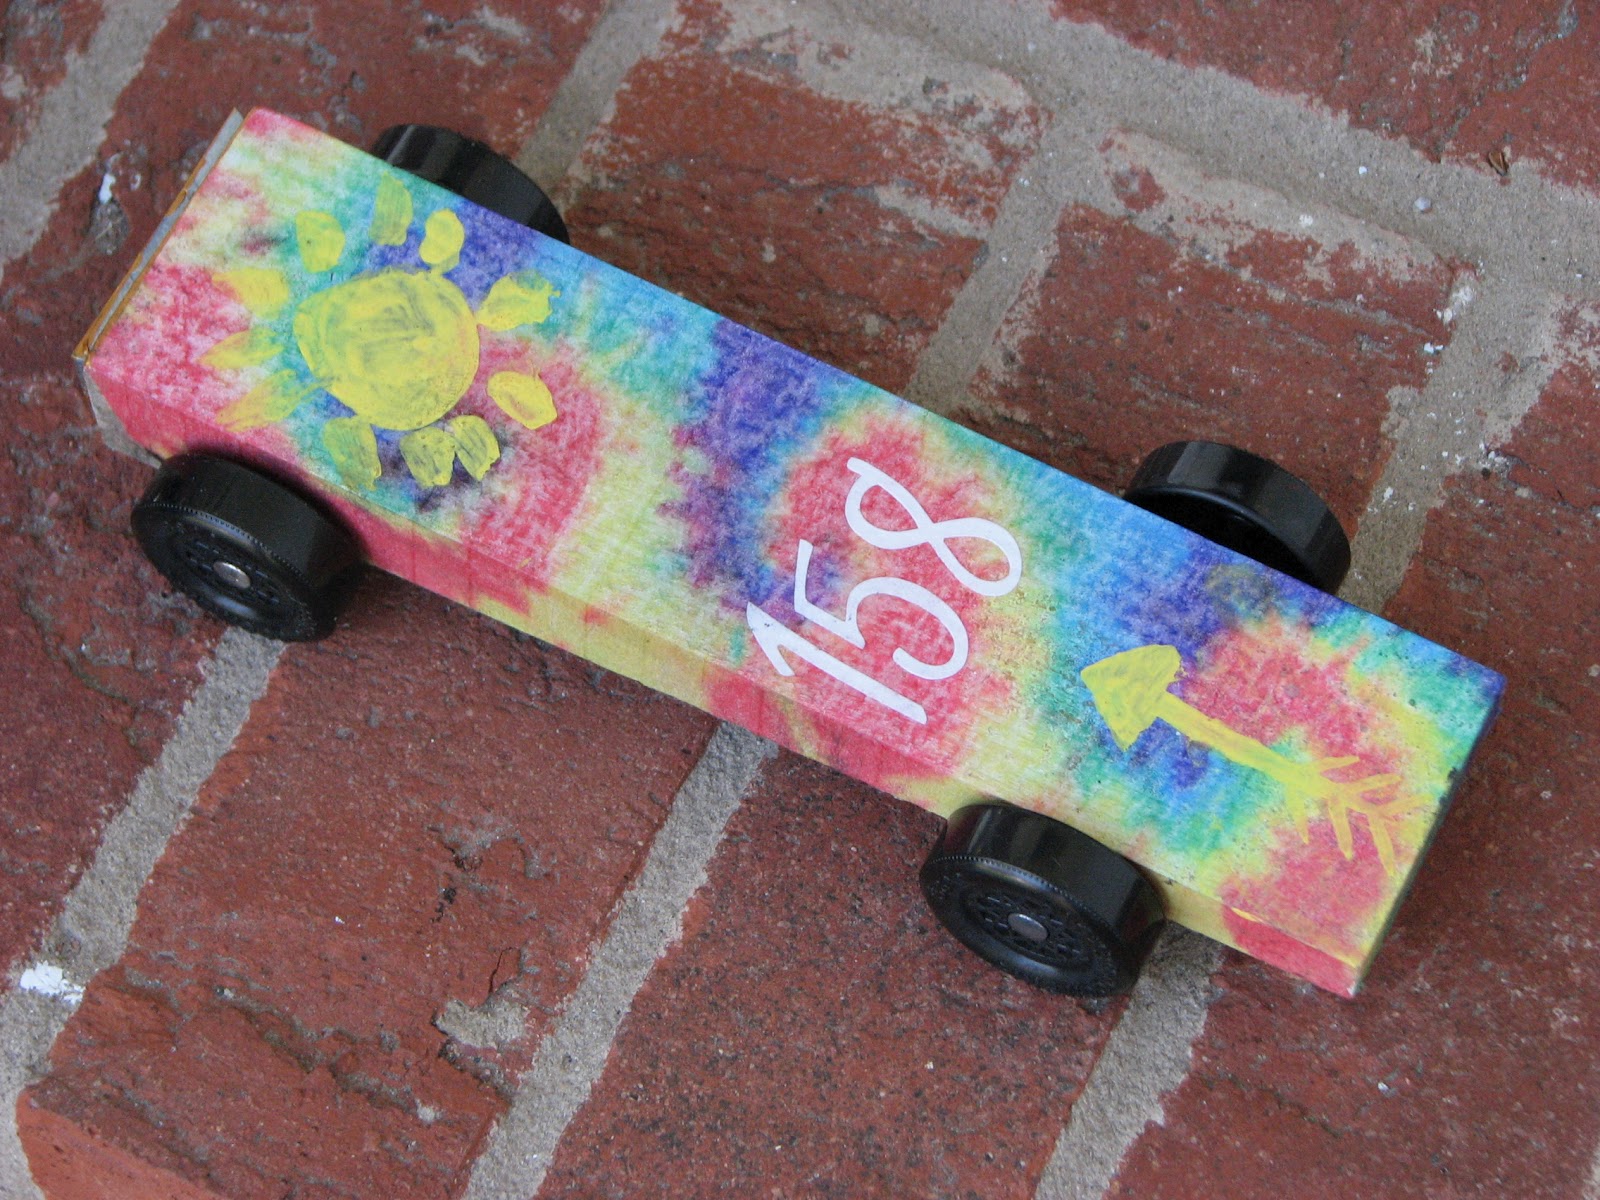 Cub Scouts are known for several things. One of those is the Pinewood Derby. And sometimes decorating your car is more fun than racing it. Last year Owen did an Auburn National Champions Car. This year he thought he'd be a little less controversial so he decided he wanted to make his car look tie-dyed. I told him that would be difficult and that I didn't even know HOW we would do that. He assured me that he could do it no problem with just regular paint. So we got out the regular paint and he got to work. About 2 minutes later he declared he didn't know how to do it and needed help. That was on Wednesday. Weigh in for the derby was less than 48 hours away! But I had a plan. I used my craftiness to come up with a way to do it.
First I found some images of tie-dye on google and let him pick the one he liked best. Then I taped a piece of tissue paper onto a piece of regular copy paper and used that in the printer to print the tie-dye pattern onto the tissue paper.
 |
| Tissue paper taped to regular paper. |
 |
| Here's tissue paper after going through the printer. This isn't the pattern we ended up using, but I forgot to get a pic of the one we did use. (That's his car on the left. He painted it gold then tried to put green tie-dye pattern on it.) |
Since the tissue paper is so thin, it can easily be modge-podged into the wooden block. After getting the tie-dye design on it, he painted a sun on it and the Arrow of Light (it's a scout thing...) and put the pack number on it.

I think it turned out awesome and we got lots of compliments and people asking HOW we got the tie-dye on there!

And of course, brother has to do one too. Riley's came with some stickers so we did the same tie-dye method as with Owen's car but then he put the window stickers and such on. Don't you love the outfit??? These are his after school clothes. He LOVES to dress up.


Friday, February 24, 2012
Smashed Brussel Taters
In the never ending quest to get attempt to persuade my boys to eat more veggies, I'm always on the lookout for a way to "cover up" the taste a veggie that will be new to them. This recipe is PERFECT for that. Before making this, I honestly don't know that I had ever had brussel sprouts before and I KNOW my kids hadn't. I wasn't even sure what they would taste like. Actually, I'm still not sure what they taste like. THAT tells you how good this recipe is! ;-)

For Smashed Brussel Taters (I made that name up myself. Clever, huh??? ;-) ), you peel, dice, and boil regular potatoes the same as you would for making regular mashed potatoes, but you also add brussel sprouts to the water and boil them along with the potatoes followed by mashing them along with the potatoes. The potatoes mixed in with the brussel sprouts helps to dilute the flavor so that your kids don't notice it. I should warn you, there will be some piece of brussel sprouts still in there that they can see so don't think you're going to completely fool them into thinking it's "just mashed taters." Then the recipe has you add cream cheese and milk and some spices along with sauted onions and such. The first time I made this I followed the recipe to the letter and it was scrumptious. Last night I was making them on a whim (I just grabbed some brussel sprouts and potatoes at the store yesterday morning and didn't remember what I else I needed) so I left out the onion and garlic and even the curry powder since that was supposed to go in with the onions. It was still YUMMY. Even the hubs agreed. I also didn't add the optional bacon this time (I did add it last time) because I was serving it with bratwurst and smothering it with gravy. Also important to note is that you can adjust the ratio of taters to b-sprouts if your kids are a little more on the picky side. One last comment, I did have trouble with it being too soupy this time. I shouldn't have added all the milk. I fixed this though by putting the whole mashed up goodness back into the pot I'd boiled the taters and b-sprouts in and let it simmer to reduce it down a bit.
The finished product was yummy. I literally finished getting it all ready 10 minutes before we had to head out the door to soccer practice so at that point I'd already made PB&J sandwiches for the boys (while I was waiting and waiting for the Smashed Brussel Taters to thicken up). But I desperately wanted to eat some so I scarfed down a brat and some Brussel Taters and gravy. Then when we got home from soccer, I had more! Tsk, tsk. I need more self-control.
Tuesday, February 21, 2012
Laissez la Bon Temps Rouler
That's Cajun (okay, maybe it's French) for "Let the good times roll!"
Today is MARDI GRAS!!! WOOOOOOOOHOOOOOOOO!!!!! Can you tell I'm excited??? I. LOVE. MARDI GRAS. When I was in 9th and 10th grade I was in Marching Band and we would go down to Mobile to be in Mardi Gras parades. It was a lot of fun but being in the parade as part of a large band doesn't allow you the chance to experience what Mardi Gras is all about. But my junior and senior years of high school changed all that.
For those who don't know, when I was in 11th and 12th grades I attended a residential public high school. You're all familiar with those, right? No? Oh, well in simpler terms, I went to boarding school. But not a stuck up, snobby, my-parents-are-too-busy-to-deal-with-me boarding school. It's a public boarding school. Meaning it's free just like any other public high school in the state. And yes, it was often referred to as a "Nerd School" because, well, most of us who went there were just a wee bit, um, nerdy I guess. Actually it focuses on math and science and we were given an amazing opportunity to take math and science classes in high school that were very much on par with what most don't experience until college. And quite a few of my fellow classmates were NOT the math and science type that I was (okay, that I AM). There was also a very extensive assortment of options for those more interested in the humanities. I've been asked more than once, "Did you WANT to go there???" Absolutely. Or "Are you glad you went there?" Heck yes. I absolutely, positively L-O-V-E-D it. It was an amazing experience and one I wouldn't trade.
I loved living in the dorms. I loved being around all my friends 24/7. And I loved the freedom and independence I had while there. I loved not being in my parents' house under their watchful eye. For those of you who really know me, you know I wasn't a rebel. I wasn't off drinking and partying all the time. I was actually quite responsible I think. Many of my friends, particularly my senior year, were a little more "into partying" but I never felt pressured to join in. So I loved living there and loved that my parents weren't constantly telling me what to do, but for the most part I know my parents would be very proud of the way I conducted myself.
I mention all of this to explain why I "heart" Mardi Gras so much. You see, this school I attended was in Mobile, Alabama. I know when you think about Mardi Gras you likely think about New Orleans and they do a fine job with Mardi Gras there, but the first Mardi Gras parade in the United States was in Mobile, Alabama. My school was located not too far from the heart of downtown Mobile and the parades passed right by the school. Let me tell you, sometimes it can be difficult to concentrate on differential calculus, but when you hear a parade going by outside on a beautiful spring-like day, concentrating becomes impossible. Really Dr. Dunagan? You really expect us to concentrate when you have all the windows in the classroom open? But I digress...
I remember the parade schedule being posted in the newspaper and we'd all huddle around to decide which ones we would go to. Most of the time we would have a huge group of us kiddos going out to enjoy the festivities. I'm sure you've heard stories about what women have to do in New Orleans to get beads, but Mobile wasn't like that. Mardi Gras in Mobile was dialed down a few notches and was much more in the teen and family-friendly arena. Getting beads was fun, but there was something I enjoyed even more. That was getting MoonPies! Apparently it's not a very well-known fact that in Mobile, in addition to beads, MoonPies are thrown from the floats. Now it's not the large MoonPies you might be familiar with but rather a smaller "single decker" version. The best part was that they were in silver wrappers so you didn't know what flavor it was until you tore into it. Mmmm. MoonPies and coffee at 11 pm with friends. Let the good times roll, indeed!
**Note: I've searched google images frantically for a pic of the silver wrapped MoonPies but haven't had any luck. Maybe they've done away with the the silver wrapper???**
Now I'm all grown up with two kids of my own and I am working to teach my boys about the awesomeness that is Mardi Gras. Every year on Fat Tuesday I cooked SOMEthing for dinner that seems, at least in my mind, to be worthy of Mardi Gras. That something usually ends up being Red Beans and Rice with Sausage, Shrimp Po' Boys, or even Jambalaya. This year it was shrimp po'boys because the hubs made Red Beans and Rice for dinner Sunday night so I was wanting something different. And of course Mardi Gras isn't complete without King Cake. Sometimes we've ordered them from Lousiana and had them shipped to us. Other times I've bought them in the local grocery store. And still other times I've attempted to make one myself. Now King Cake isn't really a cake but more of a pastry or bread. It is NOT easy or quick to make. But I'm all about easy and quick. So I've tried shortcuts with little success.
This year I was seriously thinking about making my own "from scratch" King Cake BUT I'm still trying to lose the 15 pounds I found at Christmas so I really don't want all that yumminess sitting around my house for the next week. Then I saw these mini faux King Cakes on pinterest and decided it was worth a try. Wow. It turned out SO. GOOD.
I started out trying to follow the directions from the original post I saw, but it ended up a jumbled mess! So at that point I decided to try my own thing. I took 3 of the canned cinnamon rolls, unrolled them, and braided them together neatly. Then I stretched it a little and curved it around to form a circle and baked! When they were done, I used the icing that came with the cinnamon rolls and then added my yellow, green, and purple sugar. Making colored sugar is SUPER easy, in case you haven't heard. Just put a small amount of sugar in a small contiainer, add a couple drops of food coloring, and shake until the color is distributed. Voila! Colored sugar.

This is what I got when I tried to do it according to the blog. Just a jumbled mess of dough. Actually in this picture it doesn't look so bad but trust me, it was like I just wadded up some dough and hoped for the best.
So then I attempted to use a more refined approach by using three unrolled cinnamon rolls to braid the bread before cooking. It worked MUCH better in my opinion.

Here it is at the top, braided and shaped into a ring, which is THE shape of a King Cake.

I took some "after" pics of the mini King Cakes after they came out of the oven but they weren't in focus. And honestly it's hard to tell in my pics which are the raw cakes and which are cooked. So if you want to know what it looked like after baking, just put on some sunglasses and look at the above picture again!
The boys had fun helping me make the colored sugar to sprinkle on. I did NOT put a baby inside because, well, I don't have one. I'm not talking about a real baby, of course. I'm talking about the little plastic baby that's supposed to be hidden in the cake. Luckily neither boy asked about it. They did ask for more King Cake though!

I also made a homemade Roumalade to go on my shrimp po'boy but I'll get to that another time. Right now, it's nearly midnight and I got less than 3 hours of sleep last night plus I've got to get up to go running in the morning thanks to my overconsumption of King Cake, so it's off to bed I go. And if the last paragraph or two doesn't seem to make such sense, then please excuse me... I think I nodded off at least 6 times while trying to write those last few sentences.
Today is MARDI GRAS!!! WOOOOOOOOHOOOOOOOO!!!!! Can you tell I'm excited??? I. LOVE. MARDI GRAS. When I was in 9th and 10th grade I was in Marching Band and we would go down to Mobile to be in Mardi Gras parades. It was a lot of fun but being in the parade as part of a large band doesn't allow you the chance to experience what Mardi Gras is all about. But my junior and senior years of high school changed all that.
For those who don't know, when I was in 11th and 12th grades I attended a residential public high school. You're all familiar with those, right? No? Oh, well in simpler terms, I went to boarding school. But not a stuck up, snobby, my-parents-are-too-busy-to-deal-with-me boarding school. It's a public boarding school. Meaning it's free just like any other public high school in the state. And yes, it was often referred to as a "Nerd School" because, well, most of us who went there were just a wee bit, um, nerdy I guess. Actually it focuses on math and science and we were given an amazing opportunity to take math and science classes in high school that were very much on par with what most don't experience until college. And quite a few of my fellow classmates were NOT the math and science type that I was (okay, that I AM). There was also a very extensive assortment of options for those more interested in the humanities. I've been asked more than once, "Did you WANT to go there???" Absolutely. Or "Are you glad you went there?" Heck yes. I absolutely, positively L-O-V-E-D it. It was an amazing experience and one I wouldn't trade.
I loved living in the dorms. I loved being around all my friends 24/7. And I loved the freedom and independence I had while there. I loved not being in my parents' house under their watchful eye. For those of you who really know me, you know I wasn't a rebel. I wasn't off drinking and partying all the time. I was actually quite responsible I think. Many of my friends, particularly my senior year, were a little more "into partying" but I never felt pressured to join in. So I loved living there and loved that my parents weren't constantly telling me what to do, but for the most part I know my parents would be very proud of the way I conducted myself.
I mention all of this to explain why I "heart" Mardi Gras so much. You see, this school I attended was in Mobile, Alabama. I know when you think about Mardi Gras you likely think about New Orleans and they do a fine job with Mardi Gras there, but the first Mardi Gras parade in the United States was in Mobile, Alabama. My school was located not too far from the heart of downtown Mobile and the parades passed right by the school. Let me tell you, sometimes it can be difficult to concentrate on differential calculus, but when you hear a parade going by outside on a beautiful spring-like day, concentrating becomes impossible. Really Dr. Dunagan? You really expect us to concentrate when you have all the windows in the classroom open? But I digress...
I remember the parade schedule being posted in the newspaper and we'd all huddle around to decide which ones we would go to. Most of the time we would have a huge group of us kiddos going out to enjoy the festivities. I'm sure you've heard stories about what women have to do in New Orleans to get beads, but Mobile wasn't like that. Mardi Gras in Mobile was dialed down a few notches and was much more in the teen and family-friendly arena. Getting beads was fun, but there was something I enjoyed even more. That was getting MoonPies!
Apparently it's not a very well-known fact that in Mobile, in addition to beads, MoonPies are thrown from the floats. Now it's not the large MoonPies you might be familiar with but rather a smaller "single decker" version. The best part was that they were in silver wrappers so you didn't know what flavor it was until you tore into it. Mmmm. MoonPies and coffee at 11 pm with friends. Let the good times roll, indeed!**Note: I've searched google images frantically for a pic of the silver wrapped MoonPies but haven't had any luck. Maybe they've done away with the the silver wrapper???**
Now I'm all grown up with two kids of my own and I am working to teach my boys about the awesomeness that is Mardi Gras. Every year on Fat Tuesday I cooked SOMEthing for dinner that seems, at least in my mind, to be worthy of Mardi Gras. That something usually ends up being Red Beans and Rice with Sausage, Shrimp Po' Boys, or even Jambalaya. This year it was shrimp po'boys because the hubs made Red Beans and Rice for dinner Sunday night so I was wanting something different. And of course Mardi Gras isn't complete without King Cake. Sometimes we've ordered them from Lousiana and had them shipped to us. Other times I've bought them in the local grocery store. And still other times I've attempted to make one myself. Now King Cake isn't really a cake but more of a pastry or bread. It is NOT easy or quick to make. But I'm all about easy and quick. So I've tried shortcuts with little success.
This year I was seriously thinking about making my own "from scratch" King Cake BUT I'm still trying to lose the 15 pounds I found at Christmas so I really don't want all that yumminess sitting around my house for the next week. Then I saw these mini faux King Cakes on pinterest and decided it was worth a try. Wow. It turned out SO. GOOD.
I started out trying to follow the directions from the original post I saw, but it ended up a jumbled mess! So at that point I decided to try my own thing. I took 3 of the canned cinnamon rolls, unrolled them, and braided them together neatly. Then I stretched it a little and curved it around to form a circle and baked! When they were done, I used the icing that came with the cinnamon rolls and then added my yellow, green, and purple sugar. Making colored sugar is SUPER easy, in case you haven't heard. Just put a small amount of sugar in a small contiainer, add a couple drops of food coloring, and shake until the color is distributed. Voila! Colored sugar.

This is what I got when I tried to do it according to the blog. Just a jumbled mess of dough. Actually in this picture it doesn't look so bad but trust me, it was like I just wadded up some dough and hoped for the best.

So then I attempted to use a more refined approach by using three unrolled cinnamon rolls to braid the bread before cooking. It worked MUCH better in my opinion.

Here it is at the top, braided and shaped into a ring, which is THE shape of a King Cake.

I took some "after" pics of the mini King Cakes after they came out of the oven but they weren't in focus. And honestly it's hard to tell in my pics which are the raw cakes and which are cooked. So if you want to know what it looked like after baking, just put on some sunglasses and look at the above picture again!
The boys had fun helping me make the colored sugar to sprinkle on. I did NOT put a baby inside because, well, I don't have one. I'm not talking about a real baby, of course. I'm talking about the little plastic baby that's supposed to be hidden in the cake. Luckily neither boy asked about it. They did ask for more King Cake though!

Thursday, February 16, 2012
Cakes We Love: Tiramisu Layer Cake
We had a dinnertime discussion this week about our favorite cakes and we all knew instantly which was our favorite. So this is the first in a series of posts about our favorite cakes. Riley's favorite will be last because, well, I don't think I have a picture of it which means I need to make it again so I can take a pic, right?
We're starting with my favorite. Of the four cakes we'll be talking about this is the one that came first for our family, chronologically. It also happens to be the most complicated of the four we'll be talking about. 'Cause I'm difficult that way...
It's a cake I originally made for my wonderful mother-in-law's birthday a couple years ago. She was coming to see us for her birthday weekend and I knew I wanted to make a cake for her and I knew I wanted it to be special and something specific to her. So I went to my favorite recipe site, allrecipes.com, and right there on the front page I see the featured recipe of the day and I instantly know it is THE cake. It's a Tiramisu Layer Cake. My mother-in-law loves tiramisu. It was a no-brainer. I ran my idea by the hubs and he agreed that it would be perfect for her. And she's either a really good lier or she really liked the cake. And let me tell you, I honestly believe she really liked it. It's divine!!! So with no further ado, herrrrrrrrre's the cake:
 SOMEWHERE I have a picture of a slice of it and it looks F-I-N-E. Let me tell you this is one delicious cake! The frosting is A-MAZING. It can be expensive if you don't already have the liqueur but there are some substitutions you can do for them if you're interested.
And here's the recipe:
Tiramisu Layer Cake from allrecipes.com
CAKE:
1 (18.25 ounce) package moist white cake mix
1 teaspoon instant coffee powder
1/4 cup coffee
1 tablespoon coffee flavored liqueur
FILLING:
1 (8 ounce) container mascarpone cheese
1/2 cup confectioners' sugar
2 tablespoons coffee flavored liqueur
FROSTING:
2 cups heavy cream
1/4 cup confectioners' sugar
2 tablespoons coffee flavored liqueur
GARNISH:
2 tablespoons unsweetened cocoa powder
1 (1 ounce) square semisweet chocolate
Preheat oven to 350 degrees F (175 degrees C). Grease and flour 3 (9 inch) pans.
Prepare the cake mix according to package directions. Divide two thirds of batter between 2 pans. Stir instant coffee into remaining batter; pour into remaining pan.
Bake in the preheated oven for 20 to 25 minutes, or until a toothpick inserted into the center of the cake comes out clean. Let cool in pan for 10 minutes, then turn out onto a wire rack and cool completely. In a measuring cup, combine brewed coffee and 1 tablespoon coffee liqueur; set aside.
To make the filling:
In a small bowl, using an electric mixer set on low speed, combine mascarpone, 1/2 cup confectioners' sugar and 2 tablespoons coffee liqueur; beat just until smooth. Cover with plastic wrap and refrigerate.
To make the frosting:
In a medium bowl, using an electric mixer set on medium-high speed, beat the cream, 1/4 cup confectioners' sugar and 2 tablespoons coffee liqueur until stiff. Fold 1/2 cup of cream mixture into filling mixture.
To assemble the cake:
Place one plain cake layer on a serving plate. Using a thin skewer, poke holes in cake, about 1 inch apart. Pour one third of reserved coffee mixture over cake, then spread with half of the filling mixture.
Top with coffee-flavored cake layer; poke holes in cake. Pour another third of the coffee mixture over the second layer and spread with the remaining filling.
Top with remaining cake layer; poke holes in cake. Pour remaining coffee mixture on top.
Spread sides and top of cake with frosting.
Place cocoa in a sieve and lightly dust top of cake. Garnish with chocolate curls. Refrigerate at least 30 minutes before serving. To make the chocolate curls, use a vegetable peeler and run it down the edge of the chocolate bar.
We're starting with my favorite. Of the four cakes we'll be talking about this is the one that came first for our family, chronologically. It also happens to be the most complicated of the four we'll be talking about. 'Cause I'm difficult that way...
It's a cake I originally made for my wonderful mother-in-law's birthday a couple years ago. She was coming to see us for her birthday weekend and I knew I wanted to make a cake for her and I knew I wanted it to be special and something specific to her. So I went to my favorite recipe site, allrecipes.com, and right there on the front page I see the featured recipe of the day and I instantly know it is THE cake. It's a Tiramisu Layer Cake. My mother-in-law loves tiramisu. It was a no-brainer. I ran my idea by the hubs and he agreed that it would be perfect for her. And she's either a really good lier or she really liked the cake. And let me tell you, I honestly believe she really liked it. It's divine!!! So with no further ado, herrrrrrrrre's the cake:
And here's the recipe:
Tiramisu Layer Cake from allrecipes.com
CAKE:
1 (18.25 ounce) package moist white cake mix
1 teaspoon instant coffee powder
1/4 cup coffee
1 tablespoon coffee flavored liqueur
FILLING:
1 (8 ounce) container mascarpone cheese
1/2 cup confectioners' sugar
2 tablespoons coffee flavored liqueur
FROSTING:
2 cups heavy cream
1/4 cup confectioners' sugar
2 tablespoons coffee flavored liqueur
GARNISH:
2 tablespoons unsweetened cocoa powder
1 (1 ounce) square semisweet chocolate
Preheat oven to 350 degrees F (175 degrees C). Grease and flour 3 (9 inch) pans.
Prepare the cake mix according to package directions. Divide two thirds of batter between 2 pans. Stir instant coffee into remaining batter; pour into remaining pan.
Bake in the preheated oven for 20 to 25 minutes, or until a toothpick inserted into the center of the cake comes out clean. Let cool in pan for 10 minutes, then turn out onto a wire rack and cool completely. In a measuring cup, combine brewed coffee and 1 tablespoon coffee liqueur; set aside.
To make the filling:
In a small bowl, using an electric mixer set on low speed, combine mascarpone, 1/2 cup confectioners' sugar and 2 tablespoons coffee liqueur; beat just until smooth. Cover with plastic wrap and refrigerate.
To make the frosting:
In a medium bowl, using an electric mixer set on medium-high speed, beat the cream, 1/4 cup confectioners' sugar and 2 tablespoons coffee liqueur until stiff. Fold 1/2 cup of cream mixture into filling mixture.
To assemble the cake:
Place one plain cake layer on a serving plate. Using a thin skewer, poke holes in cake, about 1 inch apart. Pour one third of reserved coffee mixture over cake, then spread with half of the filling mixture.
Top with coffee-flavored cake layer; poke holes in cake. Pour another third of the coffee mixture over the second layer and spread with the remaining filling.
Top with remaining cake layer; poke holes in cake. Pour remaining coffee mixture on top.
Spread sides and top of cake with frosting.
Place cocoa in a sieve and lightly dust top of cake. Garnish with chocolate curls. Refrigerate at least 30 minutes before serving. To make the chocolate curls, use a vegetable peeler and run it down the edge of the chocolate bar.
Tuesday, February 14, 2012
Valentine's 2012
It's been a busy week but luckily I have felt so much better than the three weeks preceding this. I had a lot of catching up to do on the things I let slide while I wasn't feeling well.
First, I had to help Riley decorate a box to take to school for Valentine's Day. I had found quite a few good ideas on pinterest and showed them all to Riley. On Thursday he came home saying he wanted his box to look like a mailbox and he wanted to color "that ninjago" to put on it. "That ninjago" is just a Lego Ninjago coloring sheet and I thought, "Yes, something easy and straight forward!" But when I go on pinterest to pull it up he saw a legoman box and quickly changed his mind. So I pulled out some empty cardboard boxes I'd saved up and got to work. It's really not as hard as you might think. The most difficult part was just waiting for the paint to dry. I let Riley pick out all the colors himself and at one point he said he did want to put a heart on it ("a heart that's been shot with an arrow") but then he changed his mind so it ended up being an all black legoman. Very Valentine-y, don't you think? But that boys knows what he wants and he wanted it this way!

The boys each picked out what they want to be on their Valentines. Owen had already declared he wanted to make the same treats for his friends that we made last year and I knew that would be easy enough.

Riley picked a ninja theme for his. I found several different ninjas for him to pick from and definitely had my favorite that I REALLY wanted him to pick, but I was afraid it was too girlie for him since it had pink on it. But lucky for me, he picked that one!!! Then I searched online and came up with at least a half dozen different saying he could pick from to go on it. One of them said, "I'll fight 3 ninjas for you." And he liked that best. Oh, except he thought what I'd said was, "I'll fight through ninjas for you." So I had to go back and change the wording on the valentines. That's the good part of making your own. You can make them say whatever you want them to!!! And Owen is obsessed with Angry Birds, so I found some great Angry Bird options for him. And he also picked the one I secretly hoped he would. For some reason the photo of Owen's Valentines is a little blurry and washed out. It has a pig from Angry Birds about to roll off the ledge and says, "Falling for you." Isn't that clever? I didn't come up with it myself. Just found it online and hoped Owen would like it! The valentine is actually a lot brighter and crisper in person, but you get the idea.

And last, but not least, Riley was assigned to bring snack on Valentine's Day. I really don't know why this was because all the kids sent in toppings for today for ice cream sundaes they are going to be making. I didn't want to send something too sweet and sugary since I knew they were doing the sundaes but since it IS Valentine's Day I didn't want to just send in pretzels (plus Riley would never stand for that!). AND I did have a recipe for granola bars I saw on pinterest that I'd been dying to try (and had already bought all the ingredients for!), so that's what I did. And they are sooooooo yummy. Peanut butter-y, honey-ey ;-), and cinnamon-y. I will definitely make these again. I did add some cherry flavored M&Ms to the top but they didn't stick very well. Maybe I should have mixed them in with the other ingredients. Or put them in the bottom. I think the kids will love them anyway! Recipe can be found here: Homemade Granola Bars

Subscribe to:
Posts (Atom)