Monday, April 23, 2012
Cinna-Bunnies
Pinewood Derby
First I found some images of tie-dye on google and let him pick the one he liked best. Then I taped a piece of tissue paper onto a piece of regular copy paper and used that in the printer to print the tie-dye pattern onto the tissue paper.
![]() |
| Tissue paper taped to regular paper. |
Since the tissue paper is so thin, it can easily be modge-podged into the wooden block. After getting the tie-dye design on it, he painted a sun on it and the Arrow of Light (it's a scout thing...) and put the pack number on it.
I think it turned out awesome and we got lots of compliments and people asking HOW we got the tie-dye on there!
And of course, brother has to do one too. Riley's came with some stickers so we did the same tie-dye method as with Owen's car but then he put the window stickers and such on. Don't you love the outfit??? These are his after school clothes. He LOVES to dress up.
Thursday, August 20, 2009
Thrift Shop Finds!

My beautiful model refused to move out of the way, so I just went with it!

I use it to store some of the larger toys that previously were taking up all our floor space. Some fit nicely underneath and others sit on top. See those toys piled up tot he right of it? Those are the ones that go on top. I haven't finished "decorating" it, but that will have to wait until next month when Riley starts to school. Owen has specifically requested it have sharks and fish and such on it.
I've been going back to the thrift store periodically and so far haven't found anything that was exactly what I was looking for AND at a price I was happy with (they like to price all the endtables and coffee tables at $20). I had 30-60 minutes to spare today so Riley and I headed down there. Got there around 11 am and saw that furniture was 50% off until noon! Found 2 tables I liked. The first is going to be used in the "reading corner" in their bedroom. I'm actually considering NOT painting it white like I'd planned because we're kind of going for a rustic look in there anyway. I do still need to get some chairs to go with it, but for now the Lil' Tot Spot will have to work. Again, it was sturdy with simple lines so if I do paint it, it will be fairly easy to sand down first. This one was marked $20 so I got it for $10.

The other table I bought was another end table. This one is also very sturdy but will require a little more time to get it sanded before painting because of all the little groves on it. Maybe I can just get a really good primer and not have to sand??? Anyway, it will probably eventually have fish or something on it too to tie it in to the coffee table turned storage shelf. You know the cute little fabric-covered, polka dotted bins on the table in the first pic? I got those at Michaels for 60% off (I think???) so they were $3-4 dollars each and I think they'll work perfectly on the little shelf of this table. Not sure when I'll have time to start working on this one, but hopefully next week! It was marked $15 (it's been there a while so I think they'd marked it down) so I got it for $7.50!

I'll post more pictures when I get it all finished or maybe even some "in progress" pics.
Gotta love a good deal... or three.
Tuesday, August 4, 2009
I almost wish I hadn't seen this...
Anyway, here's the recipe and you can go to her blog for a video showing her making it in case you have any questions. Note: She uses egg powder and powdered milk in hers but you can just use the regular stuff instead.
Minute Chocolate Mug Cake
1 coffee mug
4 T. flour
4 T. Sugar
2 T. baking cocoa
1 egg (1 T. dry egg powder and 2 T. of water)
3 T. milk (1/2 T. Dry Powdered Milk + 3 T. Water)
3 T. oil (or applesauce)
3 T. chocolate chips
small splash of vanilla
Add dry ingredients to mug and mix well. Add the egg and mix thoroughly. Pour in the milk and oil and mix well. Add the chocolate chips and vanilla. Mix again. Put your mug in the microwave and cook for 3 minutes at 1000 watts. The cake will rise over the top of the mug but don’t be alarmed! Allow to cool a little, and tip out onto a plate if desired. EAT!
Wednesday, July 22, 2009
Ready to Make Craft Kits
Owen's best friend, Emma, just turned 5. She's got plenty of toys and I was having a hard time coming up with something she'd really enjoy. She loves doing crafts at our house but her mom has told me they don't do them at home. So I decided to fix up some Craft Kits with directions and everything she needs to complete the craft all together in one spot. Owen loved this idea and helped me put them together and, of course, insisted on trying a couple of them out himself to make sure they work right. ;-) These are all crafts I found around the internet in various places because, let's face it, I'm just not creative enough to come up with these things on my own.
One of the crafts uses scrapbook paper, chenille stems (a.k.a. pipe cleaners), and buttons to make flowers. This is one of the ones we "tested." I put everything she could need to make 4 of these into a bag and added a little topper to it. I wanted to do the toppers on the computer like I did for the boys' birthday favor bags, but we were at the lake all week and I just didn't have time to design it, so I printed out the name of each craft on card stock and quickly (VERY quickly) decorated them by hand. By the time I got to the tenth craft kit, I ran out of creative ideas for the toppers.
Another one uses scrapbook paper and googly eyes to make a little bird. We also "tested" this one, and let me tell you my boys loved this. Riley, in particular, fell in love with this little paper bird and took it everywhere with him for a few days afterward. The sample in the picture is Owen's and he insisted on putting both googly eyes on one side, but both sides of the bird are done with the patterned paper so it's pretty all around.
Here's some of the other toppers. On several of them I sketched what the finished project looks like. The crafts included making crabs, jellyfish, mice, birds, zebras, giraffes, butterflies, submarines, caterpillars, and flowers and included materials such as felt, patterned scrapbook paper, chenille stems, buttons, beads, googly eyes, and clothespins. Mostly just stuff I already had at the house and I did alter most of them in some way to make it easier or prettier or to use materials I already had.
Then we decorated a little tote bag with ribbon and rhinestones. I had planned to put her initial on it too, but I forgot to pack the stuff for it to take to the lake with us, so we just kept it simple. > All the craft kits fit in this nicely and HOPEFULLY she'll use it to help keep everything organized so it's not spread all over the house.
Then we put the tote bag with the kits into a craft organizer along with markers, colored pencils, and glue so that she has everything she could need to complete the crafts! The tote bag fit perfectly into the large section of the organizer. The only hard part was figuring out how to wrap it!!!
Oh, and an added bonus is that many of the crafts came from a website of a homeschooling mom. At the bottom of each set of directions I put the website I got the craft from so they can go there for help if needed and the ones from the homeschooling mom all have tips on tying it into your school lessons. Emma is going to be homeschooled this fall so her mom can use the crafts as part of her homeschool lessons!
Sunday, February 15, 2009
Valentine's


Coming soon: The BE5K and this weekend's trip to Birmingham.
Wednesday, November 5, 2008
Halloween
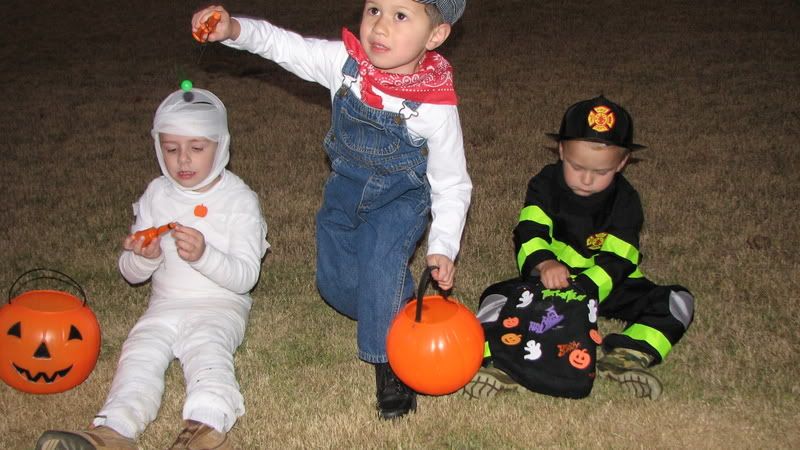
Owen decided quite a while back that for Halloween he wanted to be "that thing that's wrapped in toilet paper." I couldn't see buying a mummy costume, so we made it ourselves. It was pretty easy really. I looked for some good ideas online and decided to learn from others' mistakes and NOT just wait and wrap him up each time he needed to wear his costume. I mean, he's good at holding it, but he's still going to need to use the little boys' room at some point. So I wrapped the gauze around his pants and a turtleneck and he was able to pull them on and off whenever needed. It worked really well and he loved it.
Riley still doesn't quite get the whole Halloween thing, so Eric and I picked his costume for him. He loves sharks right now, so that's what we went with. I couldn't find a shark costume though for less than about $40 (TOO MUCH!!!) so I made it for around $5. I think it turned out pretty good and he LOVED it, so that's all that matters, right?
Anyway, here's the pics...
First Owen had Trick or Treating at school and a little party there with his friends on Thursday. Riley and I came for the party and Ry had a great time.
On the way to school...
That afternoon was our MOMS Club Halloween party.
Shark Attacks Mummy...
Riley and Julia
Then Friday night we went to a friend's house for TorTing in their neighborhood. Let me say Owen LOVED it. Here's some pics of the boys with their friends.
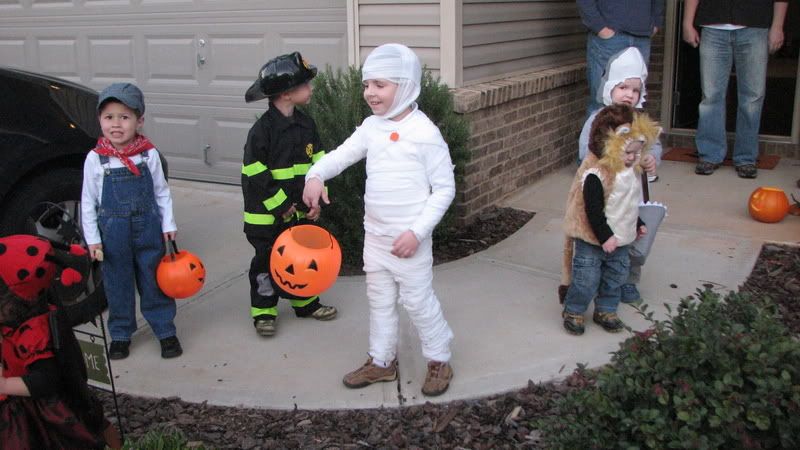
(Will, Cloe, and Owen)
Wednesday, July 16, 2008
The start of a mini-revolution.
FYI, before making any changes to your blog, be sure to save all the important information from your sidebar like the links to all your favorite blogs!
And if you've got a second, let me know what you think of the new look! I hope to one day remodel the whole thing myself...from scratch...but I don't have the time for it right now. Nor do I have the right program to create the graphics I would want.
Monday, June 30, 2008
More cuteness!
And I like these Crayon-A-Longs. There's not a tutorial for it, but how hard can it be, right???
I'm sure I've posted these Crayon Rolls before, but I still haven't gotten around to making any of them, so here it is again.
And I know it's not Easter, but I think these Chalkboard Easter Eggs are a cute idea. Oh the possibilities with colored chalkboard paint!
And I know it's not even school time, but this little number will be great for Teacher Appreciation Week. Except that Owen usually has about 25 teachers all together!
And while I'm posting things for holidays that are far, far away, how about this cute little drum valentine. I hope none of Owen's classmates are reading this because we just might do it next year for his valentines.
And here's one for an obscure holiday (obscure int he US anyway). Apparently January 26th is Australia Day and these ANZAC cookies (or biscuits Down Under, I guess) are just the thing for celebrating it. The reason I'm so excited about this is because my mother-in-law was born in Australia and her mother served in the Army there making this the perfect thing to add to our family traditions. What a find!
Well, it's dinnertime, so I've got to go feed the critters!
Saturday, June 7, 2008
If you're looking for things to do with your kids this summer...
I specifically want to try this Sink or Float experiment with Owen. We did a miniature version of it at the pool the other day and he was haing some trouble with it, so we'll keep trying.
I also like these flowers from Plum Pudding. I've got buttons, pipe cleaners (a.k.a. chenille stems), toilet paper tubes, and I'll substitute green cardstock for the felt leaves. Might be a nice project for Owen this week.
Thursday, May 15, 2008
Recent Scrappin'

Last week they had Field Day at Owen's school. All us moms went and watched (along with our little ones) and had a great time. My camera wasn't, um, working (It was NOT operator error. No, it wasn't!!! *blush*) so Rachelle was kind enough to take pics of Owen for me and she was even sweet enough to print them out for me too! So here's the spread on that.


And this last is a two page spread to go in Owen's First Year album. Yeah, he just turned 4 and I STILL haven't finished his first year. **blush again** I did stamp the date on this after I took the pic. It's from April '05 about 2 weeks before he turned 1.

Tuesday, May 6, 2008
Easter
The bear towel was easy since all it needed was ears. The boys' faces are supposed to be the bear's face so nothing extra was needed for that. In case you can't tell, they LOVE their new towels.
The duck was a little tougher to make than the bear. I didn't have anything to actually go by so I just made it up as I went along...and then had to rip a few seams and try it again. That beak was NOT easy and I had to go to plan C, I think, before it worked right.
But in the end it turned out cute (IMO) and Riley knew that the duck was a duck immediately (that's always a good thing) and loves it the most. Owen prefers the bear but for some reason I took the pics with Ry in the bear and O wearing the duck.
So there I am. One step closer to being up to date on my blog. Both the boys got older last month, so I'll have to post some pics from their specials days and party...when I find the time.
Another new craft blog...this time for the kiddos!
This is a new kids craft blog, but it's already full of great ideas. Some of them are really simple while others are a little more involved, but I think there's probably something there for everyone. Maybe you can find something to do with your little ones.
Monday, January 28, 2008
Getting ready for V-day.

My original plan was to paint the letters white, but after I finished altering the hearts, I realized they would blend in with the background too much, so I finally decided (with a little help from my friends) to do them brown. It kind of gives a chocolatey feel to them, and what is more Valentiney than chocolate?

I think it turned out really great and if I have the chance to go back, I think I'll get another set try something a little different with.
Friday, January 25, 2008
The Kidlet.
And while I'm posting links to her tutorials, here's another one that I like of hers. It is for a felt story board. I originally came across this as I was looking for a tute on how to make a felt gingerbread house that the boys would be able to rearrange the decorations as much as they wanted, but then I forgot about it. Yesterday, I was talking with some friends about felt boards like this and we were talking about doing gingerbread houses and nativity scenes on it. I like her snowman idea and would probably do a Christmas tree with decorations too. Maybe some animals and a barn. Cars and trucks and planes and trains and boats.
Wednesday, January 23, 2008
DIY Puff Paint

I ran across this blog the other day and thought the puff paint looked like a really fun idea. And the best part is that I didn't have to worry about it when my 21 mo kept repeating "Candy!" and ate the paint. Unfortunately I have all-purpose flour, not self-rising, so I looked up the conversion for it and it worked pretty good although our might not have puffed quite as much as hers. I've included my revised recipe below for using all-purpose flour. And my kids are SLOW painters so I nuked it about every 5 minutes and then let them add more to it.

DIY Puff Paint
1 Tablespoon all-purpose flour
1 Tablespoon salt
1/8 teaspoon baking powder
water
food coloring
Combine flour, salt, and baking powder. Then add water until it is a thick paint consistency. Separate into 3 or 4 small bowls and add food coloring to get desired colors.
Paint picture on thin cardboard or on cardstock using paint brushes or cotton swabs (you might try putting in a squeeze bottle to squeeze it on). Microwave about 30 seconds and it will puff up.

And here's our finished product. I'm sure it's not to impressive to most, but as their mom, I'm proud.

Monday, January 21, 2008
Dishtowel crafts
They both come from the same blog. The first idea is to use the dishtowel to make a little library tote. The second is for a kid-sized apron out of a dishtowel.
I haven't had the chance yet to try either of these, but I did buy some (rather plain) dishtowels the other day along with some bias tape, so all I need now is TIME to sit down and do the aprons. They look like they should be fairly quick and easy, but still, time is time and I'm short on it.
And of course, having boys, I need to find some cute, boyish dishtowels. Maybe some with trains or bulldozers? Anyone know where I can find those? No? Me neither.
Saturday, January 19, 2008
I know this is a little late, but...

...I'll post it anyway. Back after Thanksgiving someone (I can't remember who) directed me to the cutest little Advent Calendar I think I've ever seen. I looked at it and thought, "I can do that!" So I did. Of course by the time I finished it, December was half over, but Owen really enjoyed it and we'll be able to use it for years to come.

The original calendar I copied was by Jenny at allsorts. I did mine almost the same as hers, but, of course, we can't have anything at our house that is ALL red and white (War Eagle!) so I alternated red and white pockets with green and white ones. I think it turned out pretty good.

I made the little dangles using my circle and star scrapbook punches. The dangles go inside the pockets (along with some chocolate or little trinkets) and each day when you open the next pocket, you hang the dangle on the button. I also used some of the scraps to make a little tree that we actually used to help Owen be able to identify exactly which day we were on since it was larger than the dangles and he could see it more easily. You can see the tree hanging on the last day in the second photo.
He loved it and became obsessed with moving the tree each day and opening the pockets. And it made my days a lot easier since it helped answer the questions of, "Is it Christmas yet?" and, "Is Nana (or Aunt Whitney) coming today?" It was so handy that I'm actually thinking about making some for Halloween, Thanksgiving, and the boys' birthdays. All I have to do is find the time...